Mindblown: a blog about philosophy.
-
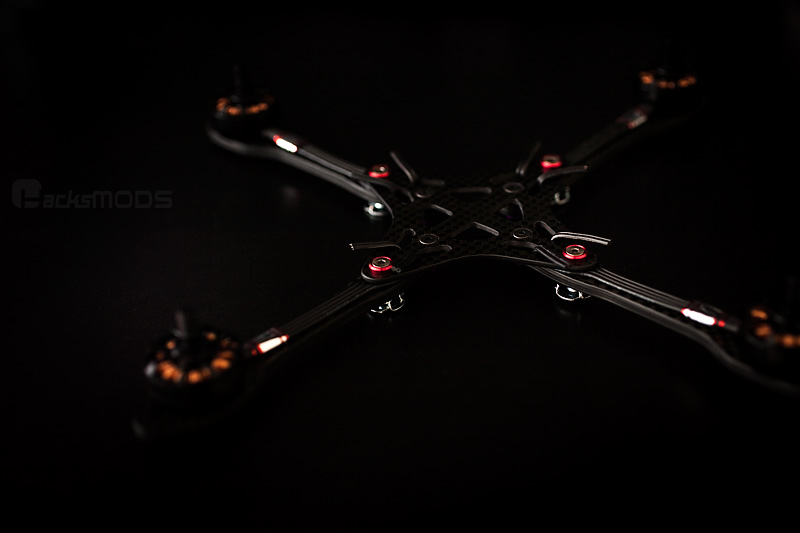
Soma’s WarpQuad
Just gonna share photos of the acro quad I am building. Thanks to Soma for coming up with the WarpQuad. Looks the best out of all the acrobatic quads out there. Here’s the center frames. It sandwiches the 4mm carbon fiber legs. I switched out some of the hardware. Such as the aluminum washer […]
-
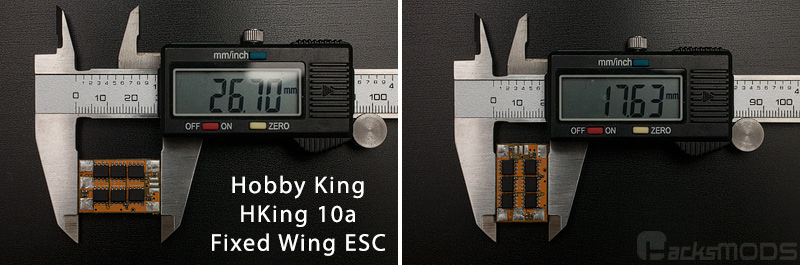
Hobby King HKing 10a Brushless ESC
Lovely spring weather means I am antsy to build and fly again. I am planning on using this Hobby King HKing 10a brushless ESC in a 230mm size acro quad. Not sure if it will be able to endure SunnySky 2204 2300kv with 3s lipo but I like the physical size…so I will give it […]
-

v911 Pro Brushless
Just stuck a brushless motor into the v911 pro frame. Flights felt underpowered. I think it will need a larger pinion. I didn’t play with it too much so I can’t tell if we can get the v911 to actually fly better. Additionally, you’ll need to reinforce the main frame after cutting away the vertical […]
-

My 1S Charging Station
Just wanted to share my new 1S LiPo charging station. I took a 1s Micro parallel charging paraboard from Hobby King and mod it to become a serial charging board. I think this paraboard would be cheaper and easier to mod. Plus, it does not have the LED that drains the first lipo cell if you […]
-

Blade Nano CP X “Logo XXtreme” Paper Canopy Orange/White/Black
Alternate color scheme…orange/white/black See the original post here: Blade Nano CP X “Logo XXtreme” Paper Canopy [button_download url=https://app.box.com/s/37zv76xm3047ngdvei8w bottom_text=”Download Nano XXTREME red/white canopy”]Download PDF file[/button_download]
-

Adapter for Nano QX FC to v929/v949/v959 Frame
For those of you installing the Blade Nano QX flight controller onto the v929/v949/v959 frame. Here’s the latest template you can print out. Overlay against a piece of clear plastic and cut out an adapter. The white rectangles are so the motor plugs on the board can have clearance. Click on the following button to […]
-
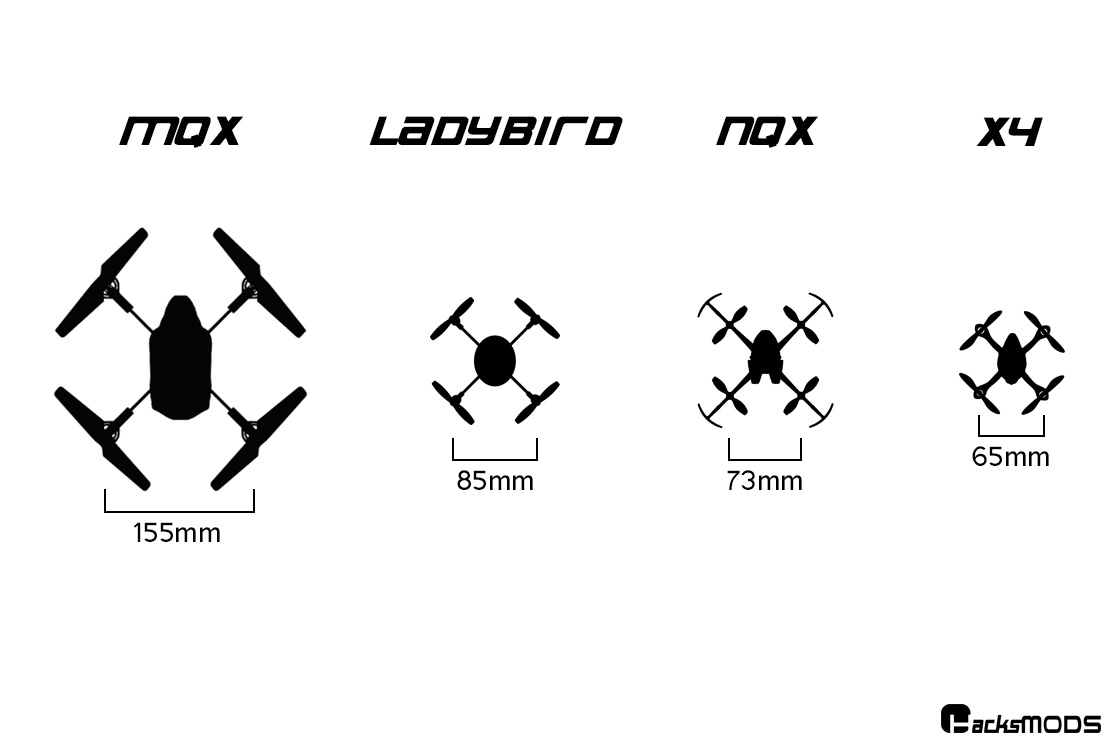
Sizes of Quads Compared
We’re talking mixing and matching quads parts to build “FrakenQuads” on the RCGroups thread: Blade nQX FC board on mQX & Ladybird size quads I know there lots of newbies looking to do this, but wasn’t sure of the relative sizes when we talk about mQX size or Ladybird size. We use those terms because […]
-

Cheap HiSky FF120 and Hobby King Qbot Micro LiPo
I needed some 250mAh 1S LiPo that will fit in the battery cage of some of the micro quad that has found it’s home in my growing fleet. On the forum, many suggest the cell BangGood listed for 5@ $12 is the best performing lipo for their micro quad. I purchased them to check them […]
-

WLToys v949 New Color Canopy
My buddy had his v949 in my lab so I can put on the better performing GWS EP5443 props. Like I mentioned in my earlier blog post, these props are a performance upgrade for Blade mQX, v929, v949 type quadcopters. I took the opportunity to paint him up a canopy in his favorite color, green. […]
-
Transmitter Mount Points
As technology progresses and we RC hobbyist find the need to mount additional things to our transmitter, the need for adjustable mount points arises. Of course, if these transmitter manufacturer were current with the time, we would have more elegant solutions in place. Instead, follow along for a solution if you don’t like every hobbyist […]
Got any book recommendations?