ZMR-X Custom ZMR Build

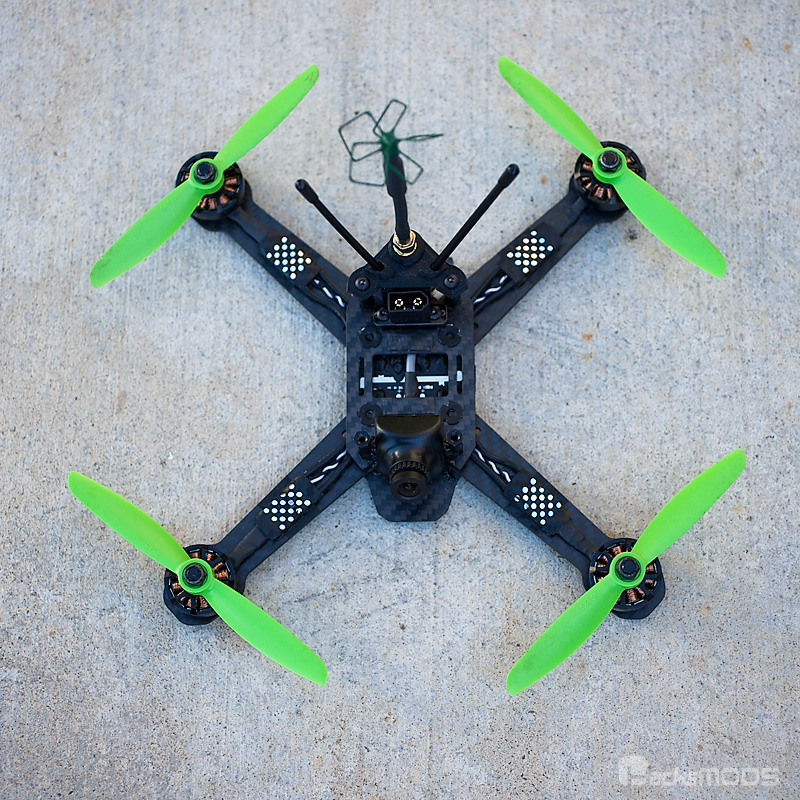
As FPV racing matures, new rules and classes are put into place. One of the rule is the “250” size racing quads need to stick with 5″ props. To breath new life into those of use who has the popular H-style ZMR250 frame, I came had an epiphany and learn that you can configure it to have the motors in an X style configuration. Where roll and pitch are exactly the same.

Beyond that…I had a few wish list items I challenged myself with. I wanted all the weight shifted to the center of gravity as possible. Including the lipo…which is the holy grail IMHO. And one day, frame designers and engineers will take this concept more seriously. In the case of us local guys that is racing with the ZMRX…it’s a 4S 1000mAh pack. For me, I like agility for racing tight tracks…so a 3S 850-1000mAh LIHV is ideal.

So begins the next step of the ZMR Lite build

I think more fun to come up with a design where others can easily follow along with their own frame. So I played with where the existing holes lined up into a perfect X. And then figured out how to cut so it’s easy for others to do. In the end, you essentially “connect the dots” for the most part.
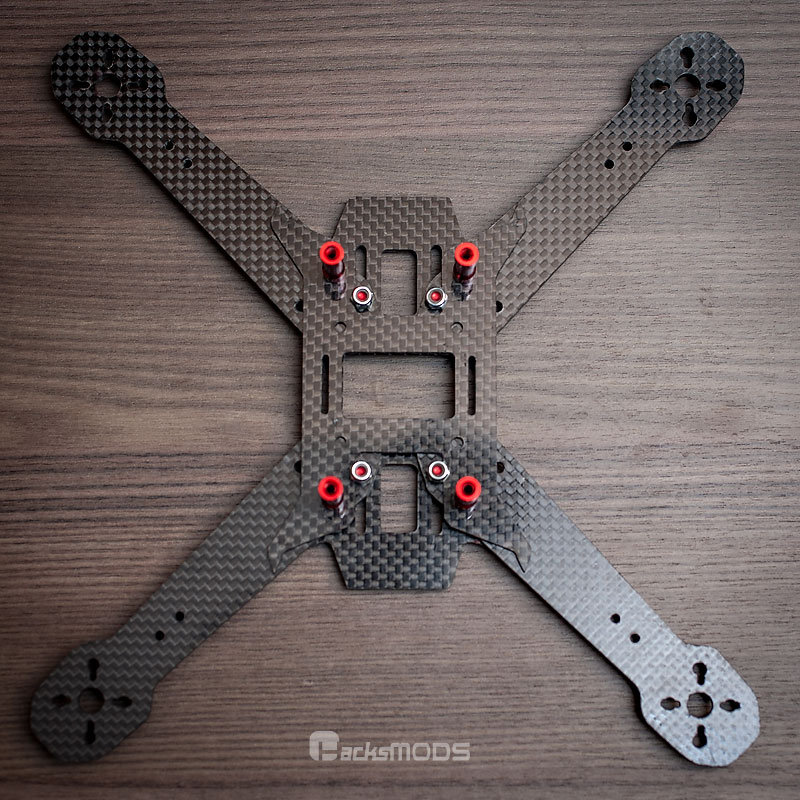
ZMRX_center_plate

Prototype #1.

daryoon_ZMR_racerX

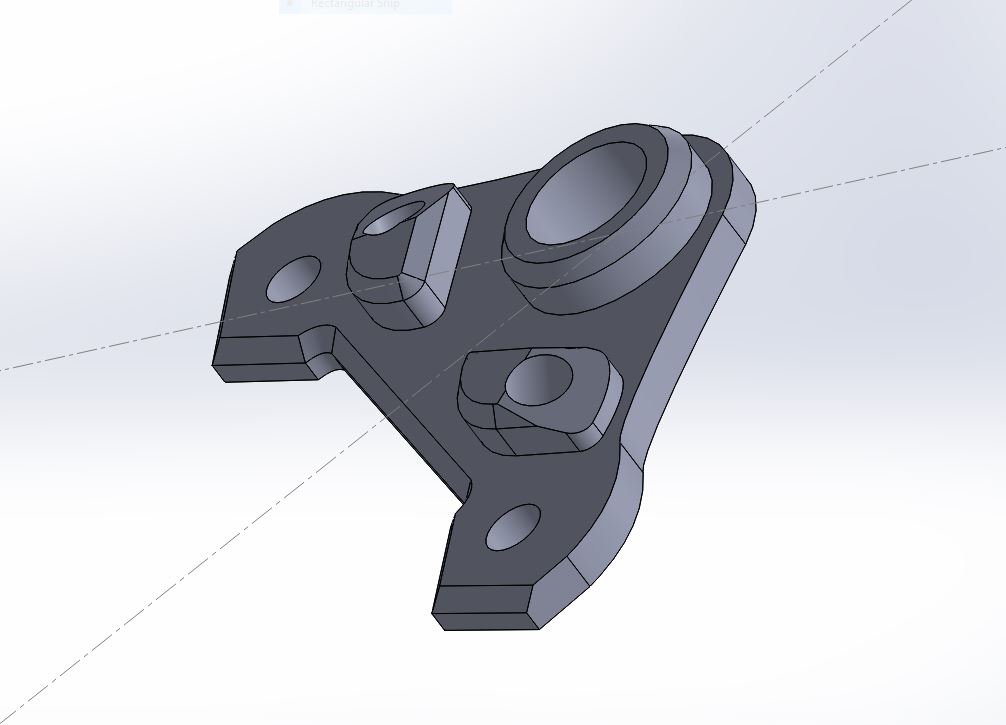
Messed with it some more in SolidWorks…

ZMRX2

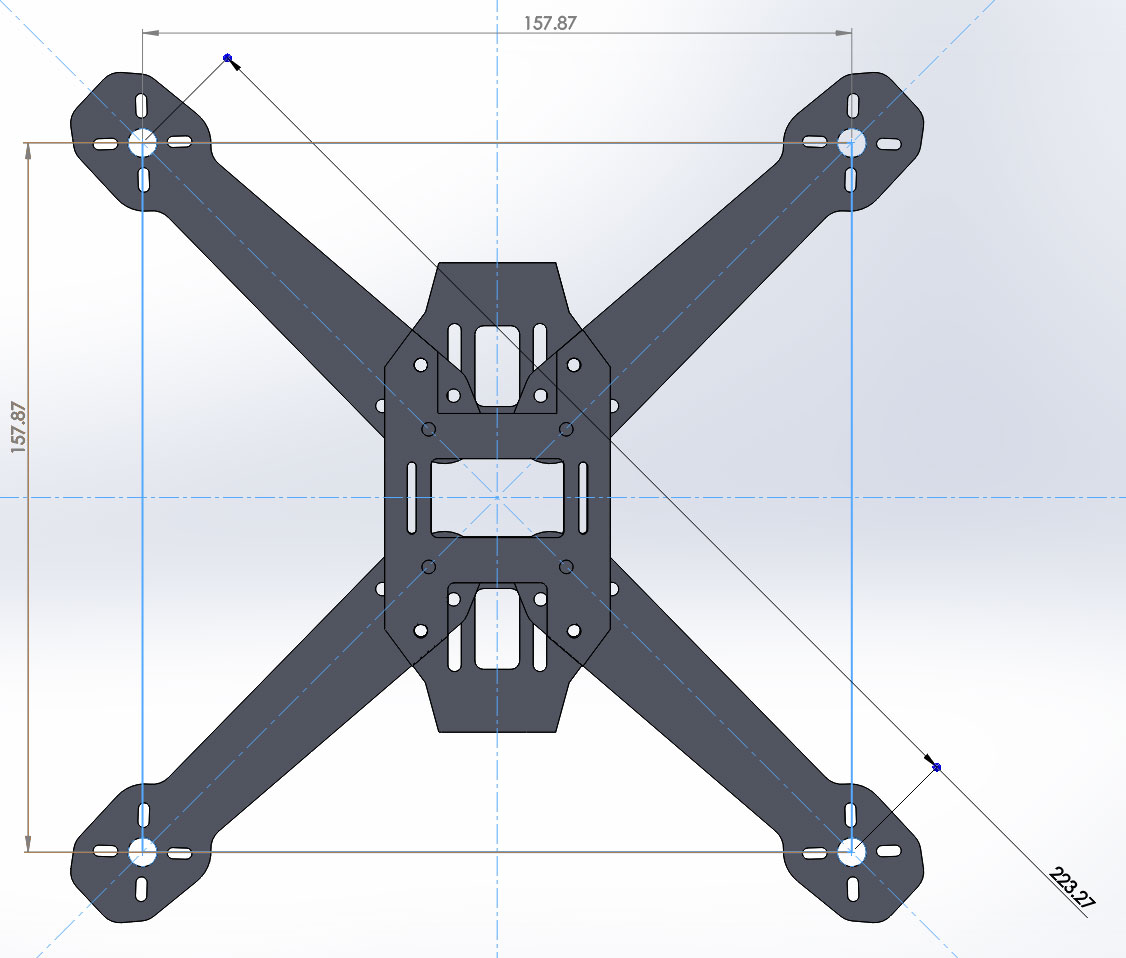
Frame currently looks like this now. Fellow local Team WarpQuad squad is building one. Will update with final build pictures of his and mine at a future date.

Daryoon_ZMRX

Here’s a photo I took before the new antenna plate. Figured it would be easier and more robust with 3D printed antenna mounts.
daryoon_zmrX_1000mah_3s_lipo_hacksmods

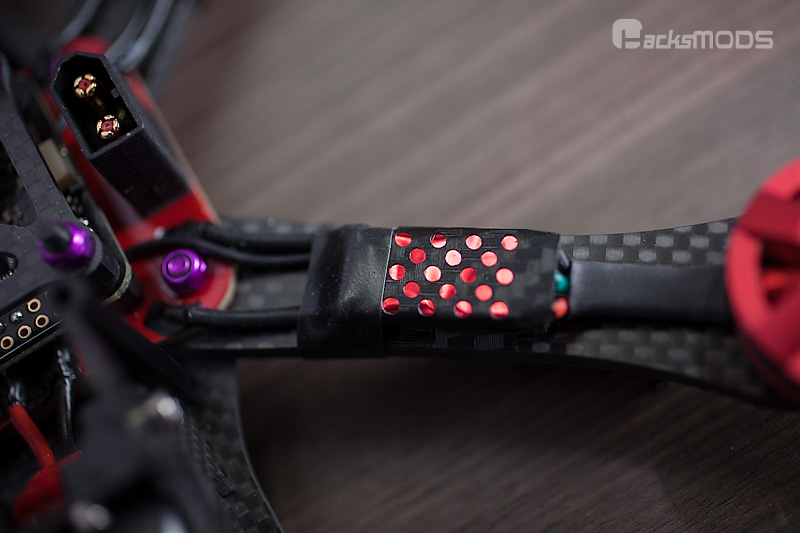
Some ppl have been asking about my arm mounted ESC treatment…so here’s a closer look on how I do it now. It consist of mylar tape in the color of your choice. I like red. It’s thin, so I feel the FETs can exhaust the heat quicker through this type of covering. Follow by a CF vinyl weave. I use my Silhouette machine to cut it out. The ESC is secure mounted to the arm with Scotch Exterior Mounting Tape. Then cut a strip of Self fusing silicone tape. I wrap the wire/soldered joint and around the arm. The silicone tape only sticks to itself. Holds strongly. And I can easily remove to access the ESC for repair/maintenance.
daryoon_hacksmods_esc_arm_treatment_wrap

And a couple of shots from the second ZMR X I put together…

Built with parts I have on hand. So a rev2 AfroMini 32. The new AfroMini 32 rev3 that I used on my ZMRX #1 is even easier to use.daryoon_zmrx_afromini_fc

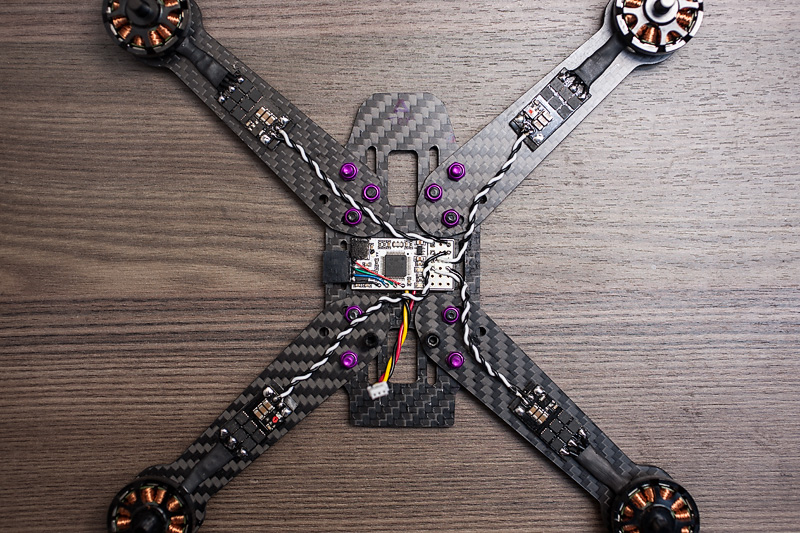
A look at the the rear where the plugs come out of. The receiver and VTX are attached vertically to the XT60 on the 10mm standoffs. The XT60 mounting board can be purchased at BangGood for $1. Or $1.99 with the XT60 soldered. I like the bare plate and solder on my own black, XT60.
XT60_mount_and_wiresdaryoon_zmrx_weight
I plan on designing a top plate that doubles as a action cam mount for GoPro or Xiaomi Yi camera. This will put the camera at the COG, so you can record your flight without making the quad’s handling too bad.
daryoon_zmrx_pdb_version

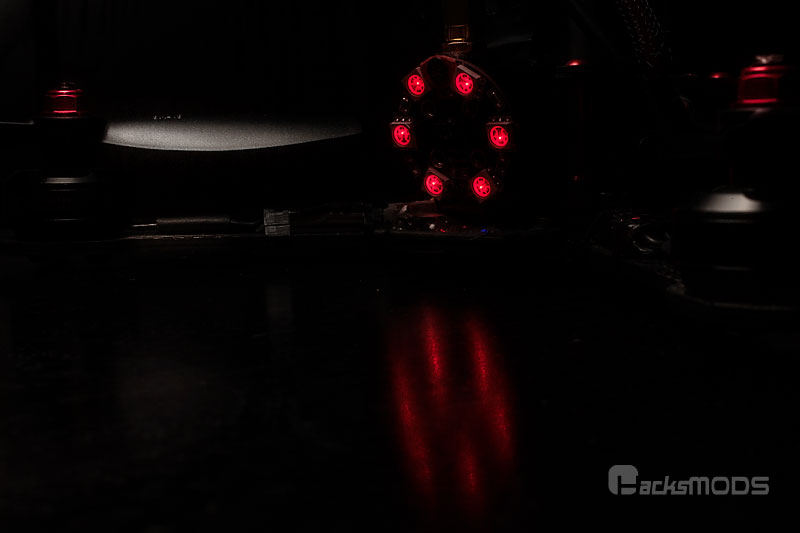
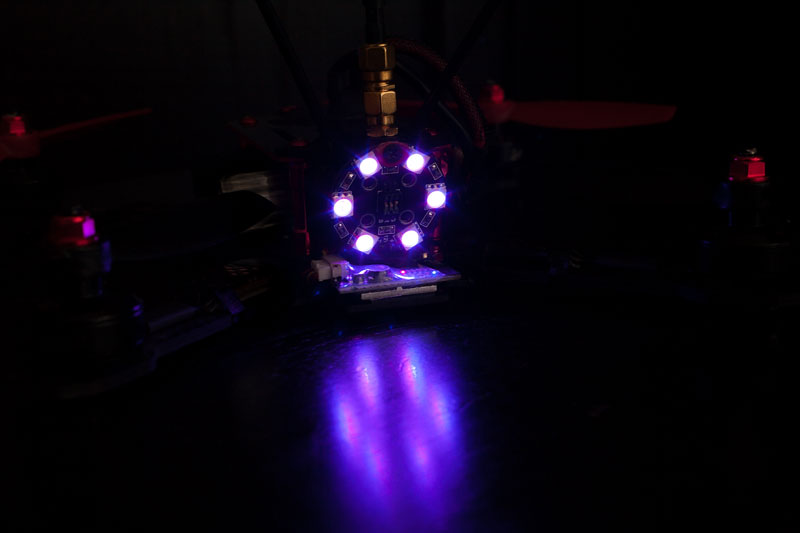
LED light ring. Color selectable via dip switch on the board.
ZMRX_light_ring__hacksmods_red_LED ZMRX_light_ring_LED

1st rev of the antenna mount… may add more features to it.
zmrx_antenna_mount

One without the VTX since the current build recommendation has the VTX antenna sticking straight out the rear. So it’s protected by the arms. And still give a good video feed during fast forward flight.
zmrx_antenna_mount_no_vtx

CAD and STL file download:
[button_download url=http://www.hacksmods.com/wp-content/uploads/2015/10/ZMRX-Daryoon.zip bottom_text=”Daryoon’s ZMRX CAD and STL files”]Download ZIP file[/button_download]

Update to add (2016-02-08) MultirotorMania has their Switchblade FPV quad frame design that I recommend to those who doesn’t have existing ZMR50 frame…or don’t like to mod their own frame into a X configuration. Perhaps built it with the ZMRX concept would take it to the next level.

Here’s a video of me cutting the plates in realtime to show you the amount of effort it takes so you can make a better decision to tackle this project.


Posted

in

, ,

by

Tags:

Comments

40 responses to “ZMR-X Custom ZMR Build”

  1. mnemennth Avatar

    Looks like a Death Metal Mosquito from Hell on Acid. ;)

    Nice tidy work as always, D. Hope it performs the way you want. I really liked my little ZMR235s, and this is very close to that configuration.

    mnem
    Fuel… Fire… Desire.

    1. hacksmod Avatar

      yeah, me too. Fellow WarpQuad pilot had to make one after seeing it. Great LOS pilot that’s finally given up hopes of HD FPV…and gonna jump in with the current tech. So he made one.

      Another local FPV pilot saw a picture of the ZMRX being passed around, and asked me yesterday how to convert his ZMR into X configuration.

  2. João Avatar

    Looks amazing.

    Can you please post the complete CAD file? I want to cut my ZMR like yours :)

    Thanks

  3. Ali Avatar
    Ali

    Hey Daryoon, Great work,
    Is it enough 2 bolts for each arm? (especially one of the bolts is for the standoff)
    is it possible for you to upload more picture of the build (different camera angles)
    and also if you place the lipo inside the frame like you have , where do you have the FC mounted?

    Thanks in advance
    Ali

    1. hacksmod Avatar

      I drilled a hole through the arms and use the bolt holes for the FC as the third bolt. I know a lot of ZMR guys do run their stock rigs with just two bolts.

      Anyways, I’ll let you tell me. LOL

    2. hacksmod Avatar

      I’ll see if I can take pictures. I figured most ppl will be doing the standard builds. With the FC in the open space and a lipo on the top or bottom of the quad.

      Putting a lipo in the center will take a lot more finesse building. ;)

      I used an AfroMini rev 3 Naze board. So it fit at the very bottom section.

  4. mihec87 Avatar

    What is the lowest possible fpv camera angle before you see propellers in video..?

    1. hacksmod Avatar

      I don’t know. Haven’t checked. But the idea behind the frame is for racing…so even the camera mount I shared is for 35 degree tilt. I figured, sooner one get used to it, the better. ;)

      That said, in recent times…I am liking being able to see the props in view. It gives me a point of reference. So not bad for beginners. I only like the props out of view for the GoPro/Mobius/Runcam recorded footage.

  5. RcxHobbyBuddies Avatar

    Daryoon, you have made it to the “X”-rated class of FPV racing, “X”-Rated = the motors have to be a placed in a perfect square, and the weight needs to be perfectly centralized and symmetrical. which I’m trying to get Chris Thomas to recognize in MultiGP, with these two met a 12:1 Thrust ratio is easily obtainable and easily maneuvered around the best of tracks without losing the speed Hope to see some video soon Great job on the build shes a sick quad for sure.

  6. Schmick Avatar

    See you Propeller in the FPV cam?

    1. hacksmod Avatar

      Depends on the angle of the camera. I fly at 35degrees…and no propeller is in view. I think at 30, you might get some in the very corners.

  7. Eric Avatar
    Eric

    Very exceptional work ! Great forward thinking !

  8. Jon Avatar

    If you don’t mind me asking, how much did this project cost in total?

    What do you think is the cheapest possible route for some one who wants to build their own reliable, video-streaming capable quadcopter?

    1. hacksmod Avatar

      It cost the same as a standard mini quad build. Just add a few rubber vibration dampener for the front tilted plate. And some 3D printed parts.

      I don’t have any big camera platform. My RCLogger is my plug and play GoPro quad.

      1. Pushpreet Singh Avatar

        I am amazed every time I look at it.
        I Google “zmrx hacksmods”, and guess what, not only your blog is the top result, it is the ONLY result.
        Now that only happens once in a lifetime.
        That just proves that you are doing some really unique work.

        I really appreciate that you are so open to sharing it too.
        Just starting a build based on similir lines and inspired from you.
        Thought I should leave a comment first.
        :)

  9. David Story Avatar

    This is such a smooth, fast, responsive flyer.
    I just finished my build, and it flies so well!
    Great design.

    Here is my parts list:
    Frame – ZMR 250 (with custom cuts)
    Flight controller – Afro Mini (rev 3)
    PDB with a 12v regulator
    Motors – RMRC Black Series 1806 2700kv
    ESCs – Little Bees 20a
    Props – HQ 5×4 carbon filled
    Flight camera – Sony HS1177
    Video transmitter – FX799T 5.8GHz 200mW w/raceband

  10. Bartosz Avatar

    Wonderfull job! can you show your PDB solution? Is it standard or custom one?

  11. S.Parrish Avatar

    Built a half-a@# version of this by roughly hacking up an old G10 fiberglass ZMR frame I had lying around. Threw some old motors and ESC’s on it, tuned it and fell in love with the way it flew, so I built a proper one (though I used full size FC and PDB) and they are all I’ve flown over the past few weeks. Thanks for the concept.

    1. hacksmod Avatar

      Very cool. Thanks for the comment. I recently redid the camera mount and I like it better. I think a proper frame designed from the ground up with centralized lipo and focus on easy to build and maintain, and you’ll have a winner IMHO. Thanks for sharing.

  12. Mikey Avatar

    Hey great build there!. .

    I am seriously considering building this myself, could you tell us what size standoffs you used? :)

    Thanks!

    Mikey

    1. hacksmod Avatar

      It depends on the battery height. So if I run 4s, I use 25mm standoffs. And about 20mm back when I used 3s lipo packs.

      I need to upload my new camera mount that I prefer to run. Printed in TPU. working well so far.

  13. Herman Sugianto Avatar

    i also build one base on your modifications.. and my friend bought it as soon as i finished… and the review… whoaahhh he said very nice… everything locks well.. and truly agile compare to his other frame …
    thank you bro.. i’m going to build another one. but i need to look for a second hand frame….

    1. hacksmod Avatar

      Sweet. I am gonna upload the latest camera mount to Thingiverse.

      One of these days, I’ll have to make available the true ZMRX concept…that isn’t a conversion/mod of ZMR frames. Should be more rigid, lighter and stronger. And hopefully easier to build.

      1. Herman Sugianto Avatar

        from the first time i purchased and owned original zmr frame.. it disappointed me.. other than hard and tough endurance… the cam mount of the original frame.. become loose.. so i cannot use it for nice view…
        and it become my unwanted frame.. but soon after i found your modification…. and including my friends review… now i love it again… lol….

        1. hacksmod Avatar

          Awesome, love hearing feedback like this.

      2. hacksmod Avatar

        Uploaded here:
        http://www.thingiverse.com/thing:1670332

        You’ll need 6mm standoffs, inserted into the bottom. 6mm m3 screw to secure to frame from the top.

        Picture once I get a moment to capture one.

      3. onyx Avatar

        Hi, What kind of PCB do you have?
        Thanks

    2. hacksmod Avatar

      Nice feedback. Love it. Thanks for commenting. I just uploaded the camera mount I currently use.
      http://www.thingiverse.com/thing:1670332

      1. Herman Sugianto Avatar

        nicely done…. but i dont have any tools…. modified one is more than enough for me.. it is super stable… super agile… and no vibration in the cam.. even it is only tied with cable ties..

  14. Herman Sugianto Avatar

    hoorraayyy i’ve gon another 2 second hand zmr frame for usd 5 / pc.. lol….. can start working now…

  15. Andrew Avatar

    Just built my first ZMRX and I am wrapped with it. Performs so much better than the original 250 which I was fairly happy with before. Love it. Thank you very much!

    1. hacksmod Avatar

      Sweet. I wish the Chinese factories would offer up a proper ZMRX version. It would be much better than the mod and having to mess with the holes.

  16. Joseph Albright Avatar

    Love this build was wondering if you had a list of materials (mainly electronics) you used as i would love to build one of these for myself and have no idea where to start. and maybe some fore photos of electronic placement and battery location. Looks amazing cant wait to see improvements and another ideas you come up with.

    1. hacksmod Avatar

      Hmmm…let me think about it. I think it would be easier with today’s electronics.

  17. LuluTchab Avatar

    Hi,
    on a picture, I saw “threaded insert” for the M3 screws to hold the middle plate. Can you tell me where you bought those M3 threaded insert ?
    Thanks in advance!

    1. hacksmod Avatar

      I got mine from HobbyKing. M3 Blind Nuts. They have two..one is bigger than the other. But are both M3 thread. I forget which is which. Order both, it’s cheap. :)

  18. Fabian Röder Avatar
    Fabian Röder

    Hi,
    can some of you post his PID-Settings Presse?
    Nice build!!!

  19. Tulistoto Avatar

    I was fairly happy with before.

Leave a Reply to hacksmod Cancel reply

Your email address will not be published. Required fields are marked *